
Rubber Neti for Nasal Cleansing: Steps, Benefits & Procedure
A soft rubber catheter clears the nasal passages more deeply than water-based neti can reach, relieving sinus congestion and preparing the breath for

Key Takeaways
- A soft rubber catheter is passed through one nostril and drawn out through the mouth.
- Reaches the soft palate area where chronic mucus collects, deeper than water-based neti.
- Practised once or twice weekly with a sterilised catheter, unlike daily jal neti.
- Success depends on breath, insertion angle, and relaxing through the brief gag reflex.
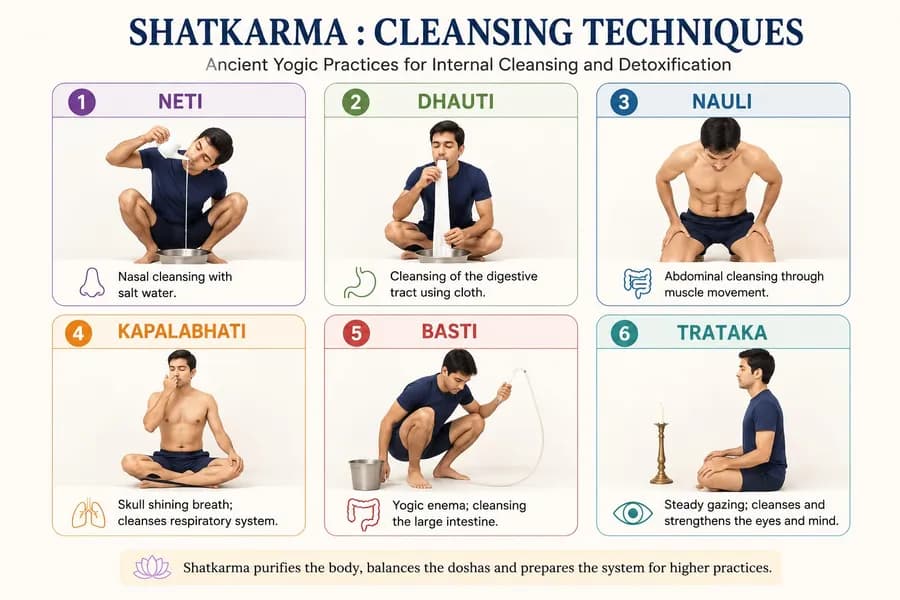
- One of six classical shatkarmas described in the Hatha Yoga Pradipika.
- Makes pranayama noticeably deeper by clearing the nasal passage that otherwise limits it.
What is Rubber Neti?
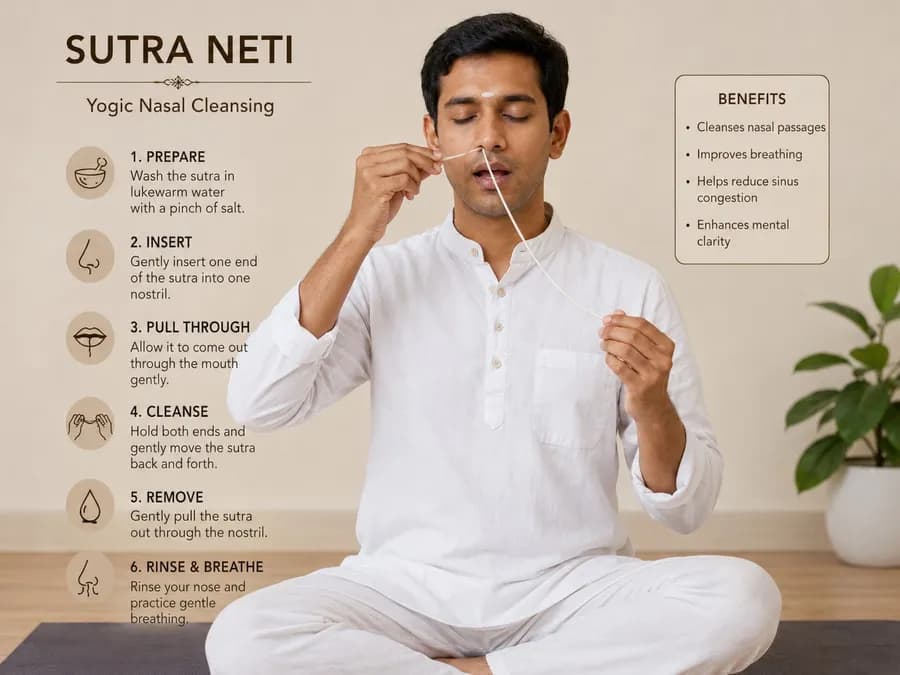
Rubber neti — Sutra Neti in Sanskrit, where sutra means “thread” or “tube” and neti means “to guide” — is a deep nasal cleansing practice from Hatha yoga’s six classical purification techniques, the shatkarmas, as described in the Hatha Yoga Pradipika. A soft rubber catheter is gently passed through one nostril, eased down the nasal passage, and drawn out through the mouth. It dislodges mucus, allergens, and dust that water-based cleansing can’t reach.
Habuild’s instructors are certified in classical shatkarma practices and guide every rubber neti session live — essential for a technique where catheter size, insertion angle, and gag-reflex management must all be corrected in real time.
It is a more advanced cousin of the yogic jal neti practice, which uses a saline pot to flush the nasal passages with water. Where jal neti works on the surface, rubber neti reaches the deeper nasal tract — particularly the soft palate area where chronic mucus collects.
The technique looks intimidating in photographs but is mechanically simple once shown live. The challenge is not the tube — it is the breath, the angle, and the willingness to relax through the brief gag reflex.
Rubber Neti Benefits
The benefits of using a rubber tube for nasal cleansing extend well beyond clearing a stuffy nose. For practitioners who also work on yoga for breathing capacity, rubber neti is the preparatory step that makes breathwork noticeably deeper — because even the best pranayama technique is limited by a blocked nasal passage.
Physical Benefits
1. Clears Stubborn Deep-Tract Mucus****Standard saline rinses move only what’s loose. The catheter physically dislodges hardened mucus along the nasal floor and behind the soft palate — the exact area where chronic post-nasal drip originates.
2. Reduces Sinus Pressure and Frequency of Headaches****By restoring drainage in the nasal passages, rubber neti reduces the back-pressure that builds up behind the brow and cheekbones. Members with chronic sinus headaches often report meaningful relief within 4–6 weeks of weekly practice.
3. Improves Breath Quality for Pranayama****Pranayama practices like Anulom Vilom and Bhramari demand clear, equal airflow through both nostrils. Rubber neti restores that airflow — making subsequent breathwork noticeably deeper.
4. Strengthens Resistance to Allergies****Regular practitioners report fewer dust, pollen, and seasonal-allergy flare-ups. The mechanical clearing reduces allergen residence time in the nasal mucosa.
Mental and Emotional Benefits
5. Sharpens Mental Clarity****Free nasal breathing improves oxygenation and reduces the dull-headed feeling many chronic mouth-breathers carry through the morning.
6. Reduces Sleep-Related Fatigue****Clearer airways at night mean less mouth breathing, less snoring, and deeper sleep — which compounds into daytime energy.
How to Do Rubber Neti — Step-by-Step Procedure
This is the section most online sources rush. Done wrong, rubber neti causes nosebleeds and infections. Done right, it takes under three minutes per nostril.
Tools You Will Need
- A medical-grade soft rubber catheter (size 6–8 for adults).
- Lukewarm sterilised saline solution (¼ teaspoon non-iodised salt in 250 ml warm filtered water).
- A clean towel.
- Mild lubricant (ghee or food-grade glycerin) for the catheter tip.
Step 1: Sterilise the Catheter
Boil the rubber tube for 5 minutes before each use. Cool to body temperature. Never reuse without sterilisation.
Step 2: Lubricate the Tip
Apply a thin coat of ghee to the first 4–5 cm of the catheter to ease passage.
Step 3: Position
Stand or sit upright. Tilt the head slightly forward — never backward.
Step 4: Gentle Insertion
Insert the lubricated tip into the more open nostril. Push gently, rotating slightly. Stop if you meet hard resistance — never force.
Step 5: Reach the Throat
Once the tube reaches the soft palate, you’ll feel it at the back of the throat. Open the mouth, hook two clean fingers in, and gently draw the tip out through the mouth.
Step 6: Pull-Through Movement
With one hand on each end of the tube, gently move it back and forth 5–10 times. This is the cleansing action.
Step 7: Withdraw and Repeat
Slowly pull the tube out through the mouth, then repeat on the other nostril.
Step 8: Finish with Jal Neti
Always conclude with a jal neti rinse to flush loosened debris. Then dry the nasal passages with kapalbhati or rapid breathing.
Preparatory Steps Before Rubber Neti
Beginners should never attempt rubber neti cold. Two weeks of preparation makes the difference between a clean experience and a nosebleed.
- Practise jal neti for 2 weeks first — to familiarise the nasal passages with intervention.
- Train the gag reflex — gently brush the soft palate with a toothbrush daily for one minute over a week.
- Confirm both nostrils are clear — never attempt rubber neti during a cold, infection, or active allergy flare.
Variations of Rubber Neti
Single-Nostril Rubber Neti (Beginner)
For those still adapting to the gag reflex, the catheter is inserted and withdrawn through the same nostril without the pull-through. Less effective but a useful stepping stone.
Classical Sutra Neti with Cotton Thread (Traditional)
The original yogic version uses a waxed cotton thread instead of rubber. It’s more authentic but harder to sterilise. Most modern teachers prefer the rubber catheter for hygiene.
Combined Neti Sequence (Advanced)
Rubber neti followed immediately by jal neti and a 30-stroke kapalbhati. This is the full cleansing sequence and the most effective for chronic congestion sufferers.
Common Mistakes to Avoid in Rubber Neti
- Mistake 1: Reusing an unsterilised tube. This is the leading cause of nasal infection in self-practice. Boil before every use.
- Mistake 2: Forcing past resistance. If the tube won’t pass, the angle is wrong. Withdraw, reposition, try the other nostril.
- Mistake 3: Tilting the head back. This sends the tube into the wrong canal and causes gagging and nosebleeds.
- Mistake 4: Practising with an active cold or sinus infection. Wait until fully recovered. Rubber neti during infection spreads it deeper.
- Mistake 5: Skipping the post-cleanse drying. Wet nasal passages invite bacterial growth. Always finish with kapalbhati or rapid breathing.
- Mistake 6: Self-teaching from video. This is the highest-risk mistake. The first 3–5 sessions need live, expert observation.
Who Should Practise Rubber Neti?
- Chronic Sinusitis Sufferers People with year-round nasal blockage benefit most. Rubber neti, paired with a structured yoga for sinus routine, addresses both the mechanical cleansing and the breath-pattern correction that chronic sufferers usually need together.
- Asthma and Breath-Restricted Practitioners Asthma management improves dramatically when nasal breathing is restored. The combined approach with yoga for asthma is the most effective long-term route for respiratory health.
- Serious Pranayama Practitioners Anyone moving past beginner pranayama into advanced practices needs clear, even nasal flow. Rubber neti is the standard cleansing prep for that level.
- Yoga Beginners Ready to Go Deeper After 4–6 weeks of regular yoga foundation, rubber neti is a natural next step. A structured yoga for beginners base is the prerequisite.
Make Rubber Neti a Part of Your Life
You now know what rubber neti is, how it works, the exact procedure, the variations, the mistakes to avoid, and who benefits most. The technique is mechanical, ancient, and effective — but it sits in a category most people will never attempt because the first attempt feels intimidating without a guide.
What Live Guidance Changes
The barrier to rubber neti is not skill — it is the first three sessions, where the gag reflex, the angle, and the breathing all feel foreign. Habuild’s certified shatkarma instructors walk you through it live, choose the correct catheter size based on your nasal passage, and stop you before a beginner mistake becomes a nosebleed. That is the difference between a technique that works and one that puts you off for months.
Why Weekly Practice Compounds
Once you have been walked through it correctly, rubber neti takes under five minutes and becomes a once-a-week habit you stop thinking about. Five minutes a week, every week, for sinuses that stay clear all year — that is the compounding effect this practice delivers.
What 1.5 Crore+ Members Already Know
The consistency gap is the entire game with shatkarma practice. Habuild’s live 6:30 AM sessions provide the fixed schedule and community accountability that makes weekly practice stick — the same accountability model that has helped 1.5 Crore+ members maintain daily yoga streaks averaging over 150 days.
Habuild’s live morning sessions include guided shatkarma instruction — your first 7 days are ₹1, with no commitment beyond that.
Rubber neti’s effect on sinus congestion and breath quality builds with regular use — practised once or twice a week over time, rather than as an occasional fix when congestion flares up. Clearer nasal passages also make the rest of a daily pranayama practice more effective. Habuild’s Yoga Everyday program can help you build that fuller daily breath and movement practice around it.
Frequently Asked Questions
Related Articles
Sutra Neti (Thread Nasal Cleansing): Steps, Benefits & Precautions
A soft, sterile thread or rubber catheter passes through one nostril and out through the mouth — the deeper companion to water-based nasal cleansing. See the steps, benefits, and precautions.

Jala Neti (Water Nasal Cleansing): Steps, Benefits & Precautions
Tilting the head sideways and pouring warm saline water through one nostril and out the other is the most widely practised of all the Shatkarmas. See the steps, benefits, and precautions.
Shatkarma: the Six Cleansing Techniques of Hatha Yoga
These six cleansing techniques of Hatha yoga range from gentle trataka eye gazing to advanced practices like vaman dhauti that carry real medical risks if